
When a ceiling fan hums but the blades will not turn, or it only starts once you reach up and give the blades a push, or it has quietly lost a speed and now runs at one lazy setting no matter where you click the pull chain, the part behind almost all of it is the capacitor. It is a small box tucked inside the switch housing, and its whole job is to give the motor the jolt of torque it needs to break into motion and then to hold each speed steady once it is running. Over years of daily use the material inside it breaks down from heat and age, the fan starts to struggle, and eventually it gives out entirely, which happens whether the fan was a bargain big-box model or a heavy premium one. The good news is that this is one of the most satisfying repairs there is, because a replacement capacitor usually costs under ten dollars, the swap takes about fifteen minutes with a screwdriver, and it brings a fan that looked completely dead all the way back to life rather than sending it to the curb and you to the store for a two-hundred-dollar replacement. It is also almost entirely universal, which matters enormously if your fan is an older or discontinued model that no store stocks parts for anymore.
That universality is the part worth understanding before you spend a cent, because it is what changes this repair from hopeless to trivial on exactly the fans people assume are unfixable. You do not match a capacitor by the brand on the motor, and in fact the brand tells you nothing useful at all. You match it by the three numbers printed on the side of the old one, and any capacitor carrying those same ratings will run your fan no matter who built it or how long ago the company disappeared. That is why a thirty-year-old Homestead or Fasco with a manufacturer that folded before you owned the house is still a completely repairable fan sitting on your ceiling. The capacitor inside it was never a proprietary part to begin with, just a generic component the factory bought like everyone else did, and the modern equivalent drops straight in and runs it exactly as it did when it was new.
The Symptoms That Point to a Capacitor and Not Something Worse
A failing capacitor announces itself in a handful of recognizable ways, and learning to read them saves you from replacing parts that were never the problem. The classic sign is a motor that hums or buzzes while the blades sit still or barely creep, because the motor is getting power but has lost the torque it needs to start turning. Closely related is the fan that will not start on its own but begins spinning if you reach up and give a blade a gentle push, which is the single most telling capacitor symptom there is, since that push supplies the starting shove the weak capacitor no longer can. Beyond those, a capacitor on its way out will often cause a fan to run noticeably slower than it used to across all settings, or to lose a speed entirely so that low and medium stop doing anything different while high limps along. Some fans simply stop responding to speed changes altogether and stick on one setting.
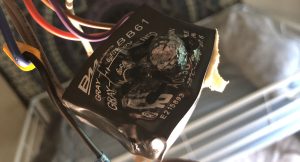
There is also a visual tell if you open the switch housing. A capacitor that has failed or is close to it frequently shows physical damage, bulging at the case, cracking along a seam, a melted or scorched look, or an oily residue where the internal fluid has leaked. If you pull the old part and see any of that, you have found your problem without needing to test anything further. A capacitor is a normal wear item, so none of this means you did anything wrong or that the fan is poorly made. The internal material simply breaks down with age and heat, which is why even a well-built fan that has run daily for years eventually needs one.
Is It the Capacitor or the Broken Flywheel?
This is the one diagnosis worth slowing down for, because a bad capacitor and a cracked flywheel produce the same headline symptom, a motor that hums while the blades refuse to turn, and the fix for each is completely different. The flywheel is the rubber hub that connects the blade arms to the motor, and when it cracks the blades are mechanically disconnected from a motor that is otherwise running fine. Telling the two apart comes down to a simple check. If you give the blades a push and the motor catches and drives them, even slowly, the motor is healthy and the capacitor is your culprit. If you push the blades and they spin loosely and freely without the motor ever taking hold, or the whole blade assembly feels disconnected and wobbly while the motor hums away, the flywheel has gone and the capacitor is fine.
The visual inspection backs up the push test. A failed capacitor tends to look bulged, cracked, or leaky as described above, while a broken flywheel shows as a split or crumbling rubber hub once you get the blades off and look at the center where they mount. It is worth making this call before you order anything, because a new capacitor will do nothing for a fan whose real problem is a shattered flywheel, and the reverse is equally true. If your check points to the hub rather than the electrical side, our guide on broken flywheel repair and replacement walks through that specific fix. If the motor drives the blades once you help them start, stay here, because the capacitor is what you are replacing.
Reading the Numbers Printed on the Old Capacitor
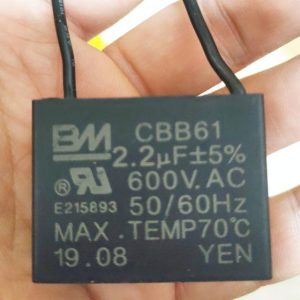
Once you have confirmed the capacitor is the problem, the entire job of buying the right part comes down to reading the label on the old one, because that label is the exact specification you match. Ceiling fan capacitors have their ratings printed right on the case, and there are three things on it that matter. The first is the capacitance, measured in microfarads and written as uF, µF, or sometimes mfd, and a multi-speed fan will list several values together such as 4.5uf plus 5uf plus 6uf, one for each speed the fan runs. The second is the voltage rating, commonly 250VAC on residential fans though you will also see 250V, 300V, and 450V. The third is the number of wires coming out of the capacitor, which tells you how many speed taps it feeds and has to match your fan.
The rule for matching is straightforward once you know it. The microfarad values should match the original as closely as possible, since those set the fan’s speeds and torque. The voltage rating must be equal to or higher than the original, and this is the one direction that matters, because a capacitor rated at the same or higher voltage is safe while one rated lower is not. The wire count must match so that every speed tap has its connection. What does not matter, and this trips people up, is the color of the wires, because wire colors vary from one manufacturer to the next and carry no fixed meaning. You connect the new capacitor by matching each wire to the same position the old one used, following the fan’s wiring rather than the colors, which is exactly why the photo step in the swap below is so important. And to say it once more, the brand is irrelevant. A capacitor stamped with your values and voltage will run a Hunter, a Hampton Bay, a Homestead, or a Fasco with equal ease.
The CBB61 and the Values That Actually Fit Your Fan
Nearly every modern replacement ceiling fan capacitor is a CBB61, a compact film capacitor housed in a small plastic box, and it is sold in a range of value combinations to match whatever your old part was rated at. Rather than a brand-specific part, you are choosing the CBB61 whose printed values line up with the ones you just read off your old capacitor. The table below lays out the common configurations by wire count and typical values, what each one runs, and the kinds of fans it fits, so you can find the row that matches your fan and order with confidence the first time.
| Configuration | Common values | What it runs | Fits |
|---|---|---|---|
| CBB61, 5-wire | 4.5uf + 5uf + 6uf, 4uf + 5uf + 6uf, 5uf + 5uf + 5uf, 4.5uf + 5uf + 5uf | Full 3-speed operation on a standard fan | The most common setup: Hunter, Hampton Bay, Harbor Breeze, Casablanca, Westinghouse, Kichler, and orphan brands like Homestead, Fasco, NuTone, and Old Jacksonville |
| CBB61, 5-wire | 2.5uf + 3.5uf + 4uf, 5uf + 6.5uf + 6.5uf, 4uf + 4uf + 2.5uf | 3-speed operation tuned for a different motor | Same broad range of fans; match the exact values printed on your old capacitor |
| CBB61, 4-wire | 5uf + 5uf | Multi-speed control on a two-value motor | Fans that used a dual-value, four-wire capacitor from the factory |
| CBB61, 2-wire | Single value, such as 1.2uf, 2uf, or similar | A single speed tap or a single-capacitor circuit | Simpler and older single-value fans |
The pattern to take from the table is that the wire count sorts you into the right family and the printed microfarad values pick the exact part within it. A standard three-speed fan almost always uses a five-wire CBB61 with three values, and the specific trio varies by motor, which is why you read them off the old part rather than guessing. If your values fall between two listed options, order the one that matches exactly, since even a small difference in microfarads changes how the fan starts and how fast each speed runs. Buy the capacitor whose case will read the same as the one you removed, allowing for an equal or higher voltage, and the fan will behave just as it did when it was new.
Swapping the Capacitor Without Getting Shocked or Miswired
Replacing the capacitor means opening the switch housing and handling wiring that carries line voltage, so the power has to be genuinely off before you begin. Switch the fan off at the wall, then shut off its breaker at the panel, and confirm the wires are dead with a non-contact voltage tester before your hands go near them, because the wall switch alone is not enough and a capacitor can also hold a small residual charge. With the power confirmed off, open the lower switch housing where the pull chains come out, which is where the capacitor lives, wired into the cluster of switch and motor leads. You will see the old capacitor, usually a small black or gray box, with its wires running into the bundle.
Before you disconnect anything, photograph exactly how the old capacitor is wired, because you will reconnect the new one to match that picture rather than trusting wire colors. Then release the old capacitor’s wires, whether they are joined with wire nuts, crimp connectors, or a small terminal, and remove it. Connect the new CBB61 the same way the old one was joined, matching each wire to the position it came from, and tuck it back into the housing so nothing is pinched. Secure the housing, restore power at the breaker, and test the fan through every speed to confirm it starts on its own and runs at all settings. If the wiring inside your fan does not resemble anything you expected, or you are simply not comfortable working with line-voltage connections, this is a reasonable job to hand to an electrician, since the part is cheap enough that paying for a short service call still beats replacing the fan.
Why Vintage and Orphan-Brand Fans Are Worth Saving
The reason a capacitor is such a valuable repair to understand is that it single-handedly rescues the fans most people assume are beyond help. Older fans from the 1970s, 1980s, and 1990s were frequently built with heavier motors and more durable materials than their modern replacements, so the fan itself is often worth far more than the part that killed it. When one of these fails, the culprit is usually the capacitor rather than the motor, and because the capacitor is universal by rating, the dead manufacturer behind the badge is no obstacle at all. A NuTone, a Homestead, a Fasco, an Old Jacksonville, or any of the other orphan brands that vanished decades ago will run again on a modern CBB61 matched to its original values, and the whole fix costs less than a restaurant lunch.
This is worth keeping in mind before anyone talks you into scrapping a solid old fan. A fan that hums and will not start looks broken in a way that feels terminal, but in the great majority of cases it is a ten-dollar capacitor away from another decade of service. If the pull chain that selects those speeds has also worn out along the way, which is common on a fan old enough to need a capacitor, our guide on pull chain replacement and repair covers that companion fix, and the two repairs together will fully recommission a vintage fan for a very small outlay.
When a New Capacitor Does Not Fix It
Most of the time a matched replacement capacitor solves the problem outright, but if you have swapped it and the fan still misbehaves, a short list of other suspects is worth checking rather than assuming the new part is bad. If the motor still hums and the blades will not turn even after the swap, revisit the flywheel, since a cracked hub produces that exact symptom and would have been the real issue all along. If the fan runs but still will not change speeds, the trouble may be the pull chain speed switch rather than the capacitor, because a worn switch can lose speed positions on its own. A fan that runs but behaves erratically can also be reacting to a wall dimmer on its circuit, which fans are not designed to tolerate, so a standard on and off switch should be feeding it. And in the rarer case where none of that applies and the motor itself has failed internally, that is the point where a well-built vintage fan has finally reached the end of its service, though it is far and away the least likely of these outcomes. For anything that points back to the speed selection, the pull chain guide is the next stop, and for a mechanical decoupling, the flywheel guide covers it.