
A ceiling fan pull chain that has gone limp, snapped off, or stopped changing anything when you tug it is one of the most common fan repairs there is, and one of the most fixable without a service call, a trip to an electrician, or any special skill beyond a screwdriver and a little patience. The tricky part, and the reason so many people order the wrong part or give up and replace a perfectly good fan, is that two completely different problems produce nearly identical symptoms from where you are standing on the floor. The chain hangs there doing nothing in either case, so the fan gives you almost no clue which one you are looking at. Sometimes the chain itself has failed, either snapping at the bead or pulling loose from the switch, and the fix takes two minutes with a part that costs about a dollar and never requires opening the fan at all. Other times the small switch inside the fan that the chain actually operates has worn out from years of tugging, and the repair means killing the power, opening the housing, and matching a replacement switch to the old one by its wiring. The difference between those two jobs is the difference between a quick fix on a step stool and a half-hour repair with the fan partly apart, which is exactly why it pays to diagnose before you buy anything. This page covers both, how to tell which one you are actually dealing with before you spend a cent, and how to buy the exact right part the first time, including for the older and discontinued fans that no store stocks parts for anymore but that are almost always still fixable with a universal replacement.
The good news for anyone with an off-brand or vintage fan is that pull chain parts are almost entirely universal, which is the single fact that changes this whole repair from hopeless to trivial. You do not need a switch made for your specific fan, because for the overwhelming majority of fans no such thing exists and none is needed. The manufacturers never made these switches themselves, they bought the same generic parts everyone else did, so the switch inside a discontinued Homestead or a forgotten Fasco is the very same component sold today under a handful of universal part numbers. What you match is the wiring, specifically the number of wires and the order of the terminals, not the badge on the motor or the year the fan was made. This is why a fan that has been out of production for thirty years, with a manufacturer that folded before you owned the house, is still a completely repairable fan. Once that idea clicks, the panic of owning a dead orphan-brand fan falls away, and what felt like a lost cause headed for the curb turns back into a few-dollar repair you can do at the kitchen table with the old switch sitting in front of you as your guide.
A Limp Chain and a Snapped Chain Are Two Different Repairs
The first thing to sort out is whether the chain broke or the switch behind it broke, because the two look identical from below and call for completely different work. If the beaded chain snapped and you are holding a piece of it, or the whole chain shot up into the housing and left nothing hanging, that is a broken chain, and it is the easier of the two by a wide margin. If the chain is fully intact and hangs normally but pulling it does nothing, or it has gone loose and floppy with no click and no response from the fan, then the switch inside has failed rather than the chain. The clearest tell of a dead switch is a chain that pulls freely and limply with none of the firm detent click you normally feel, because the little ratcheting mechanism the chain was tied to has let go somewhere inside.
Knowing which camp you are in saves you from tearing into a fan you never needed to open. A snapped chain with a healthy switch behind it gets fixed from the outside in a couple of minutes, while a dead switch means the fan comes apart. As a rough guide, a chain that failed the instant you gave it a hard yank is almost always the chain, and a chain that slowly stopped doing anything over a few weeks, or went dead quietly after one ordinary pull, is almost always the switch. There is one more possibility worth ruling out if the entire fan went dead rather than losing a single speed, and that is the capacitor, since a failed capacitor mimics a dead switch closely and is an equally cheap fix once you know to look for it.

Reconnecting a Chain That Snapped Off in Your Hand
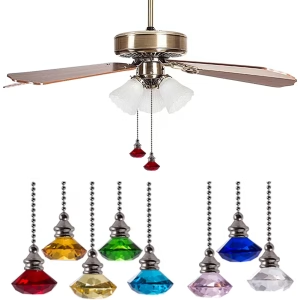
When only the chain broke and the switch still works, the repair is genuinely quick and needs no tools at all. If enough chain still hangs from the fan to grip, the simplest route is a pull chain repair connector or a replacement beaded chain extension, both small, cheap pieces sold in the parts aisle of any hardware store and on Amazon. The connector is a tiny coupling that joins your remaining chain to a fresh length of beaded chain and a new decorative pull, and it presses together in seconds. Because the switch is untouched and still doing its job, lengthening the chain restores full function without ever opening the fan. It is worth choosing a chain with a larger, more comfortable pull while you are at it, since a bigger pull invites a gentle grip rather than a hard yank and is far less likely to break again down the road.
The harder version of a snapped chain is when it broke off flush with the fan and retracted up inside the housing, leaving nothing to grab. Now there is no chain to connect to, and the fan has to be opened to reach the switch, at which point you are usually better off replacing the switch outright rather than fishing for a stub, because a chain that snapped off inside frequently took the switch’s small connecting link with it on the way. That moves the job into switch-replacement territory, which the next sections walk through step by step. Before that, though, it helps to understand why the brand on your fan makes no difference to the part you end up buying, because that single idea is what makes this repair possible on fans nobody supports anymore.
Counting the Wires Is How You Match the Part
Once you know the switch is the problem rather than the chain, the only thing that decides which replacement to buy is the wiring, not the brand on the motor. This is the part that trips people up, because they go hunting for a switch made for their exact fan when almost no such thing exists. Ceiling fan pull chain switches are universal by design, and the same small handful of switches fit the overwhelming majority of fans regardless of who built them. What you match is the number of wires coming off the old switch and the order of its terminals, and that holds true whether your fan is a current Hunter or a thirty-year-old orphan brand that vanished decades ago. Pull the old switch, count the wires, and you have what you need to order.
The common case is a three-speed fan, and its speed switch has four wires. The switch cycles through off, high, medium, and low, and on the standard part the terminals run 1-2-L-3 with the black power wire landing on the L terminal. If your old switch has four wires in that arrangement, the universal three-speed switch covered below is a direct replacement, and it is the switch living inside the vast majority of Hunter, Emerson, Casablanca, Harbor Breeze, and Hampton Bay fans, as well as the discontinued brands like Homestead, Fasco, NuTone, Leslie Locke, and Heritage. A fan with a separate pull for the light has a second, simpler switch on that pull, an on/off switch with two wires, and that is a different universal part. Some very old or single-speed fans use only that two-wire on/off switch for the entire fan. The lesson in every case is the same, which is that the wire count and terminal order are the real specification and the brand is beside the point.
One detail helps enormously with older and orphan fans. The switch stamped inside your fan may carry a part number you have never seen before, something like KTE 3089M, Sun-Lite SL-A-300, Wu Pin LJY-288A, or Well Tec E116997. These are not exotic parts you have to chase down through a defunct manufacturer. They are all equivalents of the same universal Zing Ear switch, so a switch marked with any of those numbers is replaced by the standard part below as long as the wire count matches. That is the quiet reason a discontinued fan is so often worth saving. The badge on it may be dead and gone, but the guts were never proprietary in the first place.
Opening the Fan to Swap a Dead Switch
Replacing the switch is the real repair when the chain pulls but nothing happens, and while it means opening the fan and handling line-voltage wiring, it is well within reach for anyone comfortable with basic hands-on work, provided the power is genuinely off. Start by switching the fan off at the wall, then shut off its breaker at the panel, and confirm the wires are dead with a non-contact voltage tester before you touch anything, because you will have your hands directly on the fan’s wiring. Do not lean on the wall switch alone here, since a switch can fail or be flipped back on by someone else in the house while you are up the ladder.
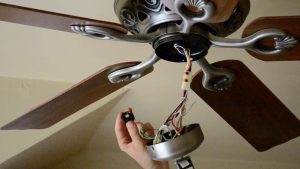
With the power confirmed off, get to the switch by removing whatever housing covers it, which depending on the fan is the lower switch cup the chain drops out of, the light kit, or the bottom of the motor housing. That exposes the switch and the cluster of wires feeding it. Before you disconnect a single wire, photograph exactly how the old switch is wired, because the entire reliability of this repair rests on putting the new switch back the same way. A pull chain switch routes the fan’s speeds through a specific sequence, and a replacement wired even slightly differently will run on only some speeds, skip one, or refuse to change speed at all. Match the new switch to the old one on wire count and speed positions, transfer the wires one at a time so you cannot lose your place, secure the switch back in its cup, reassemble the housing, and restore power. If the wire colors coming out of your fan do not match anything you expected, or you simply are not comfortable working inside a fan with wiring that carries line voltage, this is a perfectly sensible place to hand the job to an electrician, because there is no prize for pushing through connections you are unsure of.
The Universal Switches That Fit Almost Any Fan
Getting the correct part is half the battle, and pull chain parts come down to just a few universal pieces. For a snapped chain where the switch still works, any pull chain repair connector or replacement beaded chain does the job, since these simply join to whatever chain is there and need no brand match at all. For a dead switch, there are two switches that between them cover almost every fan, plus the chain parts for the easy case. The table below is the whole toolkit, matched by what the part does and by the wire count you confirmed on your old switch, so you can order the right one on the first try instead of guessing across three trips to the store.
| Part | Type and wiring | What it controls | Fits |
|---|---|---|---|
| Zing Ear ZE-268S6 | 3-speed, 4-wire (OFF, L-1, L-2-3, L-3), terminals 1-2-L-3, black wire to L | Cycles the fan through high, medium, and low | Most 3-speed fans: Hunter, Emerson, Casablanca, Harbor Breeze, Hampton Bay, and orphan brands (Homestead, Fasco, NuTone, Leslie Locke, Heritage, SMC, Regency) with a 4-wire speed switch |
| Zing Ear ZE-208S6 | 3-speed, 4-wire, sold with leads already attached | Same as the ZE-268S6, easier for a first-timer to wire | Same fans as above; choose this if you would rather match wire colors than terminal numbers |
| Zing Ear ZE-109 | On/off, 2-wire | Turns a light on and off, or a single-speed fan on and off | Any fan light with its own pull, and older single-speed fans |
| Pull chain repair connector or beaded chain | Universal, no wiring | Reattaches or extends a snapped chain | Any fan, no brand or wire match needed |
For the switch itself, the one that fits most fans is the Zing Ear ZE-268S6, a three-speed four-wire switch rated for standard household fan circuits that replaces the older ZE-208S6 and every off-brand equivalent stamped with a different number. Match it to your old switch on wire count and terminal order rather than on brand, wire the black power lead to the L terminal, and it drops straight in. If your fan has a separate light pull, the two-wire Zing Ear ZE-109 handles that on/off function on its own pull. For a chain that merely snapped with a healthy switch behind it, skip the switches entirely and grab a repair connector or a longer beaded chain, which need no matching at all. Keeping your fan’s model information handy is still worth doing for the rare fan with an unusual integrated switch module, but for the overwhelming majority of fans, current or long discontinued, these few universal parts are the entire solution, and the repair costs a few dollars rather than the price of a service call or a whole new fan.
The Mistakes That Turn a Ten-Minute Fix Into an Afternoon
A handful of predictable errors are what turn this simple repair sour, and all of them are easy to sidestep once you know to watch for them. The most common by far is buying a switch that does not match the original, either a different wire count or a different number of speeds, which leaves the fan stuck on some speeds or unable to change speed at all. This is exactly why wire count and speed positions matter more than how the part looks, and why photographing the old wiring or carrying the old switch to the store earns its keep. Two switches can look identical and be wired for completely different fans, so the appearance is never the match, the connections are.
The second frequent slip is buttoning the fan back up before testing it. Once the new switch is wired in but while the housing is still open, restore power just long enough to click through every speed and confirm the light works, because catching a reversed wire with the housing open takes a minute, and catching it after full reassembly means taking the whole thing apart a second time. The third mistake is losing track of the original wiring in the first place, which the photo prevents outright, so take it even when you feel certain you will remember. The fourth belongs to the chain side rather than the switch, and it is forcing or overtightening a chain connector, which is built to join with light, firm pressure and nothing more, so cranking on it only cracks the coupling. None of these is dangerous, but each one costs an afternoon, and every one is avoidable with a moment of care at the right step.
Keeping the Next Chain From Breaking
A fan that broke a chain or a switch once tends to do it again, so it is worth a moment on why these fail in the first place. Chains almost never wear out on their own. They break because they get yanked hard or pulled at an angle, which stresses the thin link where the chain meets the switch and eventually snaps it or tears the switch’s internal connection loose. The single most effective habit is to pull straight down and gently, and if there are kids in the house who treat a dangling chain as an irresistible target, a shorter chain or a quick word about easing it down heads off most breakages before they happen. When a particular fan keeps eating chains, a longer chain with a larger, easy-to-grip pull often solves it just by making a gentle pull the natural motion rather than a careful one.
If you are tired of the repeat repair altogether, the permanent cure is to take the chain out of the equation completely. Adding a remote control or a compatible wall control lets you run the fan and light without ever touching a pull, which removes the one part that keeps failing. That upgrade makes particular sense on an older fan you like and want to keep in service, since it modernizes the daily use without asking you to replace a fan that still runs perfectly well. Between a two-minute chain connector for a snapped chain, a careful like-for-like switch swap for a dead one, and a universal part that fits nearly anything on the market or long off it, almost every pull chain problem on any fan, current or discontinued, comes out a cheap and satisfying fix rather than a reason to start shopping for a new fan.