
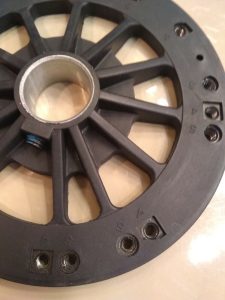
When a ceiling fan motor runs and hums the way it always has but the blades sit still, or turn slowly and loosely as if they have come unhooked from whatever drives them, the part that has almost certainly failed is the flywheel. It is the hub that sits between the motor and the blades, connecting the two so the motor’s rotation actually reaches the blade arms, and on the great majority of fans it is made of rubber. That rubber is the weak link. Over years of heat and daily use it hardens, cracks, and eventually splits, at which point the motor keeps spinning inside while the blades no longer come along for the ride. It is one of the most common failures on older fans, and it turns up constantly on Hunter and Casablanca models in particular, where the rubber flywheel was standard for decades.
The reason this is worth diagnosing correctly is that a broken flywheel looks and sounds exactly like a different failure, and the two get confused all the time. The good news is that once you have identified it, the flywheel is an inexpensive part and a very doable repair, and like most fan components it is universal in the way that matters. You do not match a flywheel by the brand on the motor. You match it by its dimensions, so a fan from a manufacturer that folded decades ago is still perfectly repairable as long as you can measure the old part. That is why a well-built vintage fan is almost never a lost cause over a cracked hub.
The Symptoms of a Cracked Flywheel
A failing flywheel gives itself away through the relationship between the motor and the blades, which stop moving together. The clearest sign is a motor that clearly runs, humming and working the way it normally does, while the blades either sit completely still or rotate slowly and weakly with no real force behind them. Because the rubber hub has split, the motor’s rotation is no longer being transmitted out to the blade arms. Related to that, the blades on a fan with a broken flywheel often feel loose or droopy, sagging slightly or wobbling in a way they never did when the fan was healthy, and you can sometimes spin the blade assembly by hand and feel it move independently of the motor rather than being locked to it. On some fans the first hint is a knocking or clunking as the cracked flywheel shifts on the shaft.
If you open the fan up and look at the hub where the blade arms meet the motor shaft, a failed flywheel is usually visible on inspection. You will see the rubber split, crumbling, or separated into pieces, and once you spot that there is nothing more to diagnose. Like the capacitor, the flywheel is a normal wear item rather than a sign of a defective fan. The rubber was always going to age, and a fan that has run daily for fifteen or twenty years has simply reached the point where the hub gives out, which says nothing bad about the fan itself. In fact the fans that outlast their flywheels tend to be the sturdier older models worth keeping in service.
Is It the Flywheel or the Capacitor?
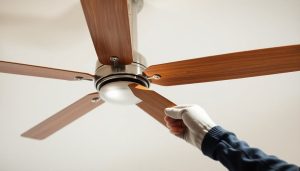
This is the one call worth slowing down for, because a cracked flywheel and a worn capacitor share the same headline symptom, a motor that hums or runs while the blades will not turn, and the repairs are completely different. The way to separate them is a simple hands-on check. Give the blades a push and watch what the motor does. If the motor catches and begins driving the blades once you help them start, even if it runs slowly, the motor and its coupling are fine and the problem is electrical, which points to the capacitor. If you push the blades and they spin loosely and freely while the motor keeps humming without ever taking hold of them, the mechanical link has broken and the flywheel is your culprit. The decoupled, free-spinning feel is the tell, because a healthy flywheel would transfer the motor’s grip to the blades and you would feel that resistance.
The visual check confirms it. A broken flywheel shows as split or crumbling rubber at the hub, while a failed capacitor tends to look bulged, cracked, or scorched in its housing. It is worth making this determination before you order anything, because a new flywheel does nothing for a fan whose real problem is a dead capacitor, and the reverse is equally true. If your check points to the electrical side, with the motor able to drive the blades once you start them, our guide to ceiling fan capacitor replacement covers that fix in full. If the blades spin free and disconnected from a humming motor, stay here, because the flywheel is what you are replacing.
Measuring the Old Flywheel So the New One Fits
Since a flywheel is matched by its dimensions rather than by a brand name, the entire job of finding the right replacement comes down to measuring the old one accurately once you have it out. There are four measurements that determine fit, and getting them right is what guarantees the new hub seats on the shaft and accepts your blade arms. The table below lays out what to measure and why each one matters, so you can record all four before you go looking for a part.
| Measurement | What it is | Why it matters |
|---|---|---|
| Center shaft hole | The diameter of the hole in the middle that slides onto the motor shaft | Must match the motor shaft so the flywheel seats properly and the set screw grips |
| Outside diameter | The overall width of the flywheel disc across the widest point | Sets the reach to the blade arm mounting holes and clearance inside the housing |
| Blade bracket pattern | The number of blade mounting holes and the spacing between them | The blade arms must line up with the holes, so blade count and spacing have to match |
| Set screw type | The size and style of the screw that locks the flywheel to the shaft | Determines the wrench you need and confirms the new part clamps the same way |
Take those four numbers off the old flywheel and you have its full specification. It also helps to note how many blades the fan carries, since flywheels are commonly sold by blade count, a four-blade hub and a six-blade hub having different mounting patterns. Do not worry about the brand at this stage, because a hub that matches your four measurements will run the fan whether the motor says Hunter, Homestead, or nothing legible at all. If the old flywheel has crumbled so badly that a measurement is hard to take, the motor shaft diameter and the blade count together will usually get you close enough to identify a compatible part.
Finding a Replacement Flywheel for Your Fan
Rubber flywheels were used across an enormous range of fans, which is what makes replacements findable even for defunct brands. The list of manufacturers that built fans around a rubber flywheel includes Casablanca, Hunter, Emerson, Homestead, Fasco, NuTone, Old Jacksonville, Regency, Minka, Fanimation, American Pride, Trade Winds, Key Largo, and many more, so parts suppliers who serve the repair market stock hubs to fit most of them. Replacement flywheels are typically listed by the fans they fit, and you will see them described in terms like a hub for a six-blade Homestead, a flywheel for the Fasco 972, 994, 995, and AM400 motors, or a four-blade unit with a particular shaft size that covers the Fasco 985 and 990 along with certain Homestead and Key Largo fans. That fitment style is exactly why your measurements matter, because a single hub often covers several models and brands at once as long as the dimensions line up.
Casablanca and Hunter flywheels are among the most commonly searched, both because those fans were sold in huge numbers and because their rubber hubs are a known failure point on older units. When you shop, lead with your measurements and blade count rather than only the brand, and confirm the shaft hole and mounting pattern against the listing before buying. For a truly obscure fan where no listing names your model, a universal rubber flywheel matched on the four measurements above will do the job, since the part was never proprietary to begin with. This is the same principle that makes the capacitor and the pull chain switch replaceable on orphan fans, and together those three parts account for the overwhelming majority of repairs an old fan will ever need.
Removing the Blades and Getting to the Flywheel
Replacing the flywheel means getting the blades off and reaching the hub on the motor shaft, and as with any fan repair the power comes off first. Switch the fan off at the wall, shut off its breaker at the panel, and confirm the wiring is dead with a non-contact voltage tester before you start, since you will be working close to the motor’s electrical connections. With the power confirmed off, remove the blades by taking out the screws that hold each blade arm to the motor, which lightens the assembly and gives you clear access to the hub. On many fans the job is far easier if you take the whole motor down from the ceiling and work on it at a bench or table rather than overhead, and it is worth the extra few minutes to do so.
Once you can see the flywheel, take note of how it sits on the shaft before you disturb anything. Some fans, Casablanca models in particular, are more involved here because the switch housing and shaft are pressed into the motor and have to be worked out to free the hub, so if your fan resists a simple removal you are likely dealing with that design rather than doing something wrong. On most fans, though, the flywheel is held to the shaft by a set screw, and the hub comes off once that screw is released. Mark the flywheel’s exact position on the shaft before removing it, because the new one needs to sit at the same height for the blades to spin level.
Swapping the Flywheel Without Losing the Wiring
The detail people miss on a flywheel swap is that the motor’s wires usually run up through holes in the flywheel itself, so removal and installation are not purely mechanical. Before you slide the old hub off, take a photo of how the wires are routed through it and how the switch housing is wired, because you will thread the new flywheel the same way. Loosen the set screw, and if the wires pass through the hub, gently free them so the old flywheel can come off the shaft. Then route those same wires through the matching holes in the new flywheel, slide it onto the shaft to the position you marked earlier, and tighten the set screw firmly against the shaft so the hub cannot slip. A new flywheel sometimes uses a slightly different set screw or a different size of Allen wrench than the original, so check that before you assume your old wrench fits.
With the new hub seated and locked, reconnect any switch housing wires exactly as your photo shows, reattach the blade arms in the same positions, and put the motor back on the ceiling if you took it down. Restore power at the breaker and run the fan through its speeds, watching that the blades turn evenly and without wobble and that the motor now drives them the way it should. If the blades spin true and the fan runs quietly, the repair is done, and you have saved a solid old fan from the landfill over a part that costs a fraction of a replacement. If the wiring inside your fan does not match anything you expected, or the motor removal on your particular model looks daunting, handing this to an electrician or fan technician is a reasonable call, since the part itself is cheap enough that a short service visit still beats buying a new fan.
Why Orphan-Brand Fans Are Worth the Repair
The flywheel is one of the reasons a vintage fan is so often worth saving rather than scrapping. Fans from the 1970s through the 1990s were frequently built with heavier, better motors than their modern budget equivalents, so the fan hanging from your ceiling may be worth considerably more than the cracked rubber hub that stopped it. When one of these fails on the flywheel, the dead manufacturer behind the badge is no obstacle, because the hub is matched by measurement and the compatible part is still made. A Homestead, a Fasco, a NuTone, an Old Jacksonville, or any of the other orphan brands from the peak fan years will spin again on a correctly sized replacement flywheel.
It is worth keeping that in mind before anyone tells you a humming, non-spinning fan is finished. Between the flywheel that couples the blades, the capacitor that starts the motor, and the pull chain switch that selects the speeds, almost every failure a vintage fan suffers traces back to one of three inexpensive, universally available parts. Diagnose which one has gone, match it by measurement or rating rather than by brand, and a fan that looked ready for the curb goes back to work for another decade. For a well-made older fan, that is a far better outcome than replacing it with something newer and lighter that will not last as long.